How to create a SQL Server Instance on Amazon RDS

In this blog post let’s see how to create a SQL Server Instance on Amazon RDS (Relational Database Service). I will be using defaults for most of the part in this screenshot tour to keep it simple. This post doesn’t cover what a VPC is, What a Security Group is etc, Instead the focus of this post is to create a SQL Server Instance(Express) which is Free-Tier eligible, so that you can get your hands dirty playing with  your cloud databases.

First and foremost login to your AWS console. You can sign up for 1 year free tier services.
Navigate to Services and locate Database->RDS.

1

Just to avoid any costs, check to display only free tier eligible services. As you can see SQL Server Express Edition is Free Tier eligible.

2

After selecting, Pick your version, License model, Instance Class(t2.micro is pretty basic 1 GB, 1 vCPU machine which is what we get for free) etc as shown below.

3

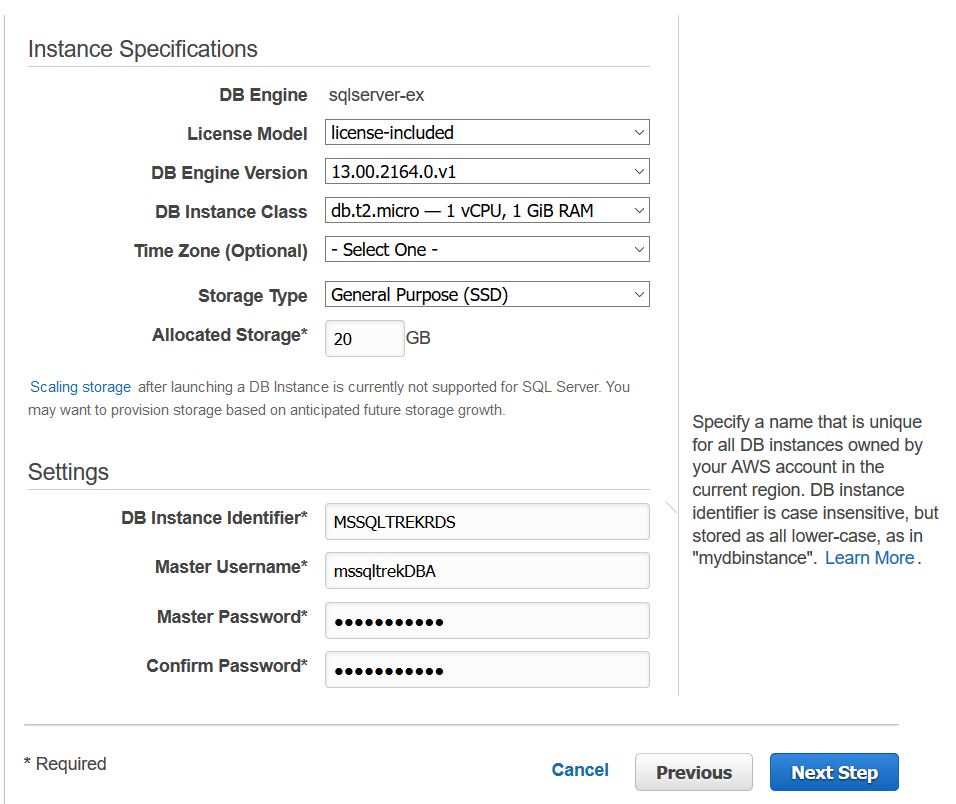
As I mentioned earlier, I am leaving all the values to default with publicly accessible as YES.

4

Choose your Backup retention period. I changed it to 0 from 7 (I don’t want any backups for this LAB).

5

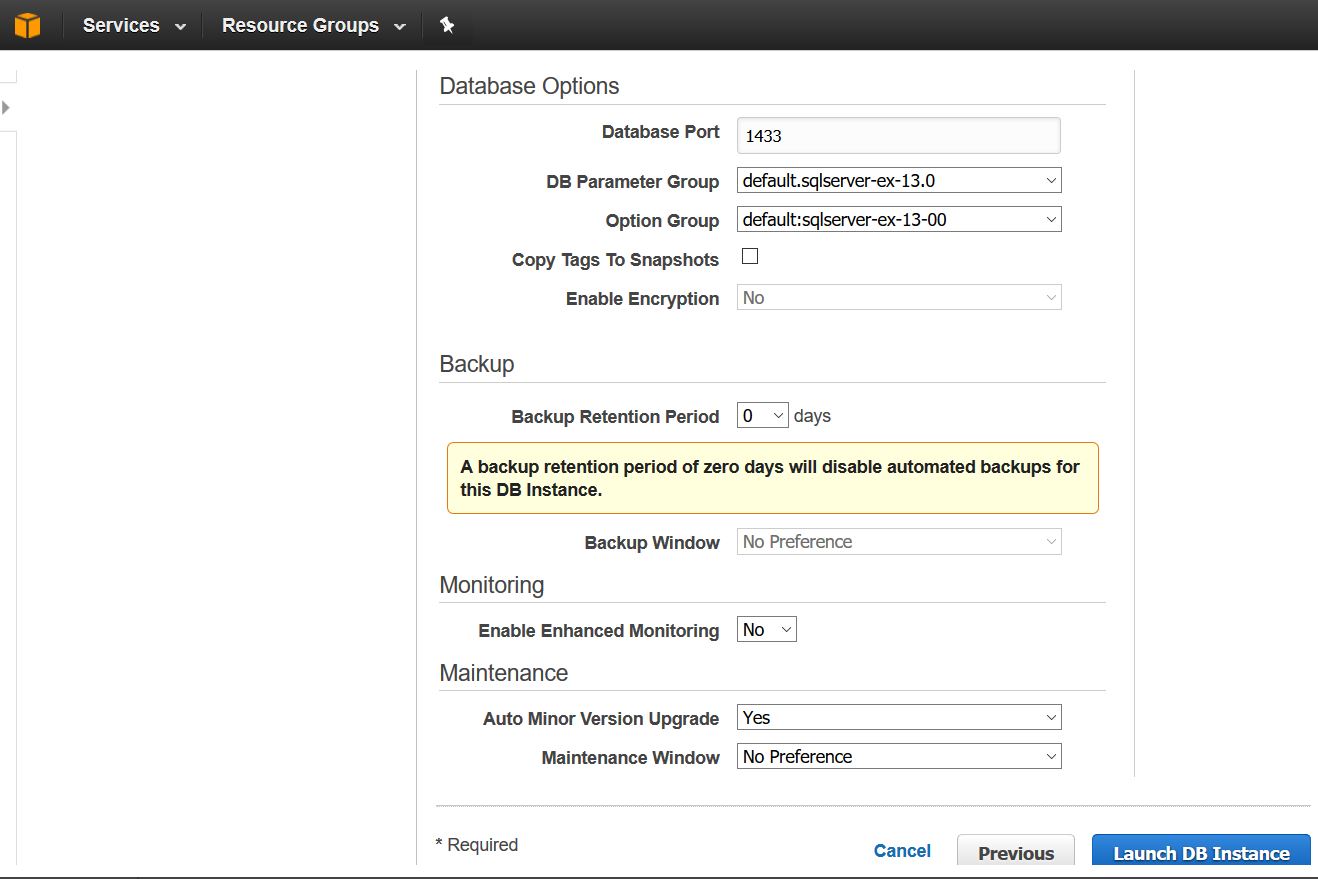
Click Launch DB Instance and wait for few minutes(It took about 15 mins in my case for AWS to prepare my Instance)

6

Violaa! That’s it. It’s ready as you can see below.

7

How to connect to this RDS Instance using SSMS?

Copy the ENDPOINT without the port number, That’s your Instance name which you should be using to connect from SSMS or any other client tool. Select SQL Server Authentication and provide the user name and password which you’ve provided earlier while provisioning Instance.

8

As you can see now I am connected from my SSMS and If you are curios, the account which we did provided during setup has been created as a SQL login with below shown Server role membership.

9 10

Recently, Amazon has announced that we can directly restore the databases to RDS Instances using Backup files from On-premise SQL Servers. Just place the backup files in your S3 bucket(If you are new to AWS, just think S3 as your Backup Storage. S3 is not the actual storage for servers from which disks are carved out…S3 is just to store raw files) and restore from there. This makes DBA job so painless, instead of fighting with data migration services.(Hope Azure guys are listening to me 🙂 )

That’s it for now guys! I would recommend you guys to spun up something in cloud in your leisure and have fun!

Upgrading Windows Failover Cluster 2012R2 to 2016

In this blog post, let’s see how to upgrade a Windows Server 2012R2 Failover cluster to Windows Server 2016. My current LAB setup is a 3 node cluster, all running 2012R2 and I decided to upgrade them to 2016 to learn new features/enhancements of windows server 2016. Thought of coming up with a short blog post on how to perform this if anyone of you are on the same boat as me.

Anyways….Here’s my current lab setup.

1_current_clust_config

Before moving on…what options do I have for upgrading my cluster?
Option 1: Install Windows Server 2016 on a completely new machine and introduce to the existing cluster and move roles and remove the old 2012R2 node….Work on the next node and perform the same….so on…till all your nodes in your cluster are 2016 machines. As the last step Raise the Cluster functionality level to 2016.

Option 2: Select a node which you want to upgrade, drain roles->evict node->Perform in-place upgrade from 2012R2 to 2016->Introduce the upgraded node back to cluster. Perform the same till all your nodes in your cluster are 2016 machines. As the last step Raise the Cluster functionality level to 2016.

NOTE: Yes, you can have windows server 2016 and windows server 2012R2 nodes participating in the same cluster. It’s called mixed mode, which is a new compatibility feature/enhancement introduced to transition from server 2012 R2 to 2016 without downtime. However you can’t leave the cluster in that state for ever. You’ve 4 weeks time to be in supported state. As soon as all the nodes in the cluster are upgraded to server 2016 the cluster functional level should be upgraded. Once this is done, we can’t revert/rollback, we can’t add 2012 R2 nodes to this cluster anymore.

I’ve chosen to perform inplace upgrades(Method 2 as mentioned above). Would I do this in Production? Probably not.

Now…I’ve drained the node which I would like to upgrade to 2016 and evicted from cluster.

2

3

It’s gone! My current cluster state at this point is shown below.

4_node_evicted

Now…I inserted 2016 media on the server which I just evicted and performed upgrade.

5_install

6

7_upgrade_drive

I had no free space on C$, so I ended up adding a new drive(U$) to facilitate upgrade process. Well, It failed…I had to expand Drive C$ and restart the process!!

8

After struggling for around 90 minutes or so, I am all set.

9_upgrade_done

Now, I am reintroducing the node back into the cluster.

10

12

13

14

Alrighttttttttttttttty…..Here it is!

15

As you can see below, Current cluster functional level is set to 8. Once all the nodes have been upgraded to 2016 in this cluster, we should upgrade functional level as I already mentioned and the below command would return 9 as the output.

16

There you go guys, Hope this helps. Happy weekend!

Update: After spending few more hours, I was able to upgrade all my nodes to 2016 and upgraded cluster functionality level. It’s no longer in Mixed Mode(in other words, I won’t be able to add a windows 2012 R2 node to my cluster). See below…As I mentioned above, the cluster functional level is set to 9 after I issued “update-clusterfunctionallevel”

last


How to move AlwaysON AG Databases ?

Back in 2011, we have seen how to move a database which is participating in DB Mirroring here. In this blog post, let’s see how to move a database which is participating in a AG to a new drive(location). In my AG setup,I’ve three replicas(2 near Replicas-Sync mode and 1 far replica sitting in a different data center-Async mode). The database which I will be moving to a new location is “sales”. See below for current paths.

1

Now we shall move these files to below mentioned new location (In this post, let’s see method two mentioned below):

E:\Devices\MSSQL13.MSSQLSERVER\MSSQL\DATA ( MDF File)
F:\Devices\MSSQL13.MSSQLSERVER\MSSQL\Data ( LDF File)

Method one:

Remove the database from AG.
Detach the database.
Move the files physically to new location(s).
Attach the database.
Rejoin the database in your AG.

Method Two:
In this method we shall see how to move files without removing the database from AG.

Steps to perform in sequence:

Suspend data movement for the database which you are working on to all replicas.
Logically move the database files(On all the Replicas).
Stop the SQL Server services. – This step will create an outage for all other databases residing on this instance.
Now move the physical MDF and LDF files to your new location.
Start the SQL service from config manager.
Resume data movement.

Before proceeding any further, I made sure the new path exists on of my  replicas.

1.

2

2. Run this on all the replicas.

3

Now…I stopped SQL Services and moved physical files to new locations and started SQL Server.

3. Now resume data movement.

4

Voila…Now it’s all set as per my requirement.

5

That is it folks for today! Have fun…

Lab setup – AlwaysOn AGs in a Multi Subnet Cluster – Part 2

In part1, I’ve shown how to create a windows cluster in a multi subnet setup.  In this post let’s see how to create a AG and corresponding listener.

In my lab, I will be creating two AGs and two corresponding listeners.

Details:
I’ve two databases – > sales and customers.
Two AGs – > Sales_AG and Customers_AG.Two Listners – > sqllst_Sales and sqllst_Cust.
For sales AG, I’ve disabled “Database level health detection”, a new feature introduced in SQL 2016.

AG1

ag2

Now, for Listener two IPs from both subnets have been provided.

ag3

ag5

Same process has been followed for creating customers AG and listener as well(But this time I’ve enabled Database level health detection).

ag4

Since this is a multi-subnet setup two entries(one from each subnet) will be created in DNS for each listener name as shown below.

ag_final

That’s about it folks.

Lab setup – AlwaysOn AGs in a Multi Subnet Cluster – Part 1

Let’s see how to setup an AG(SQL 2016) in a multi subnet cluster(Geo cluster) in a lab environment.

Below is my lab setup:

Two Replicas sitting in my Production Data center.(Subnet 192.168.1.x) – Sync Mode Automatic Failover.
Third(Far) Replica sitting in my DR Data Center.(Subnet 192.168.2.x) – Asynch Mode Manual Failover.

So, What do we need to be able to setup multiple subnets and routing in a lab environment? Answer is “Routing and Remote Access“. Have that installed by going to Add Roles/Features on your AD/DNS server.

Pre-req Step: Created 2 NICs on my SANDC machine with IPs 192.168.1.100 and 192.168.2.100

Open Routing and remote access config tool; right click on the root node and select “Enable and Configure Routing and remote access”.

Now…under IPv4, under General right click and select new routing protocol and select “RIP Version 2 for Internet Protocol”.

1

Now right click on RIP and select new interface and select your NIC1 and hit okay and next repeat the same step and select NIC2 this time and click okay. You are done with routing…That’s all you need for routing to work(As long as you got all the IPs and DNS details right).

2

4

3

5

Now, I’ve setup 3 nodes(two nodes(Prd) in 1.x and one(DR) in 2.x) and installed Failover Cluster feature on all the nodes and disabled all firewalls.

My PRD nodes: STLSQLAG1 and STLSQLAG2.
My DR Node:AZSQLAG3

Do find all my NIC settings from all my nodes at the very end of this post.

Now, Let’s create Windows Cluster:

Please refer to my earlier posts on how to create a cluster under “Clustering category” for detailed steps. Below are the steps at a high level.

clu1

clu2

clu3

Now…My cluster is ready, but it’s missing Quorum which is very critical for a cluster to be healthy. For that I’ve created a File share witness as Quorum.

clu4

clu5

FYI, NIC settings from Cluster manager are shown below.

clu6

clu7

NIC settings on all of my nodes:

STLSQLAG1: (1 NIC Card)

nic1

STLSQLAG2: ( 1 NIC Card)

nic2

AZSQLAG3(DR Server): 1 NIC Card

nic_AZ_DR

AD/DNS Server: ( 2 NICs one for 1.x and other for 2.x)

nic3_sandc

nic4_sandc

In this post we’ve seen how to setup a geo cluster in a lab environment. So, this completes the prep work needed from Windows stand point…Let’s see how to create AGs and Listeners in our Multi Subnet environment in next part of this series.