Upgrading Windows Failover Cluster 2012R2 to 2016

In this blog post, let’s see how to upgrade a Windows Server 2012R2 Failover cluster to Windows Server 2016. My current LAB setup is a 3 node cluster, all running 2012R2 and I decided to upgrade them to 2016 to learn new features/enhancements of windows server 2016. Thought of coming up with a short blog post on how to perform this if anyone of you are on the same boat as me.

Anyways….Here’s my current lab setup.

1_current_clust_config

Before moving on…what options do I have for upgrading my cluster?
Option 1: Install Windows Server 2016 on a completely new machine and introduce to the existing cluster and move roles and remove the old 2012R2 node….Work on the next node and perform the same….so on…till all your nodes in your cluster are 2016 machines. As the last step Raise the Cluster functionality level to 2016.

Option 2: Select a node which you want to upgrade, drain roles->evict node->Perform in-place upgrade from 2012R2 to 2016->Introduce the upgraded node back to cluster. Perform the same till all your nodes in your cluster are 2016 machines. As the last step Raise the Cluster functionality level to 2016.

NOTE: Yes, you can have windows server 2016 and windows server 2012R2 nodes participating in the same cluster. It’s called mixed mode, which is a new compatibility feature/enhancement introduced to transition from server 2012 R2 to 2016 without downtime. However you can’t leave the cluster in that state for ever. You’ve 4 weeks time to be in supported state. As soon as all the nodes in the cluster are upgraded to server 2016 the cluster functional level should be upgraded. Once this is done, we can’t revert/rollback, we can’t add 2012 R2 nodes to this cluster anymore.

I’ve chosen to perform inplace upgrades(Method 2 as mentioned above). Would I do this in Production? Probably not.

Now…I’ve drained the node which I would like to upgrade to 2016 and evicted from cluster.

2

3

It’s gone! My current cluster state at this point is shown below.

4_node_evicted

Now…I inserted 2016 media on the server which I just evicted and performed upgrade.

5_install

6

7_upgrade_drive

I had no free space on C$, so I ended up adding a new drive(U$) to facilitate upgrade process. Well, It failed…I had to expand Drive C$ and restart the process!!

8

After struggling for around 90 minutes or so, I am all set.

9_upgrade_done

Now, I am reintroducing the node back into the cluster.

10

12

13

14

Alrighttttttttttttttty…..Here it is!

15

As you can see below, Current cluster functional level is set to 8. Once all the nodes have been upgraded to 2016 in this cluster, we should upgrade functional level as I already mentioned and the below command would return 9 as the output.

16

There you go guys, Hope this helps. Happy weekend!

Update: After spending few more hours, I was able to upgrade all my nodes to 2016 and upgraded cluster functionality level. It’s no longer in Mixed Mode(in other words, I won’t be able to add a windows 2012 R2 node to my cluster). See below…As I mentioned above, the cluster functional level is set to 9 after I issued “update-clusterfunctionallevel”

last


Awesome Task Manager of Windows Server 2012.

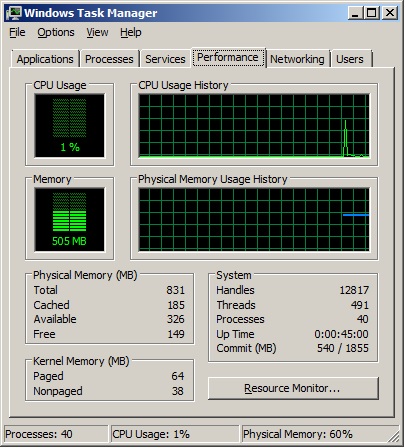
Let me ask you this, how many of you as Server Admins/Database Admins used Task Manager of Windows in the past? I bet, all of you! Well, how many of you thought “Aah, It gives some useful information, but not everything”. I fall in the second category. It’s a very great tool for understanding about your server(but, I would say from 20,000 foot distance). Wouldn’t it be great if it really shows you how many Physical Sockets your server have, how many CPU’s(not logical), hyperthreading,what is the Rated Speed and what’s the actual current Speed your CPU’s are currently running? Yes, that’s what I’m talking about. You can get all this information at a single glance now on Windows Server 2012/Windows 8 :). Let me show you Windows Server 2008R2 Task Manager first.

Don’t get surprised looking at my Single CPU 🙂 It’s my DC, a Virtual Machine in my lab.

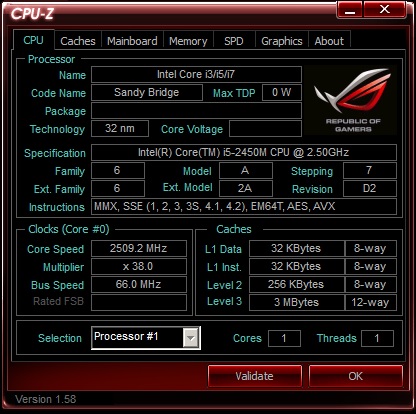
Anyways, are you able to see anything which I mentioned earlier? Nope. Basically we have to rely on some third party tool(I prefer CPU-Z for a high level internal details).

As you can see below, CPU-Z tool is giving all the cool information which I’m looking for. It’s pretty awesome tool to have in your toolkit if you are not already aware of.

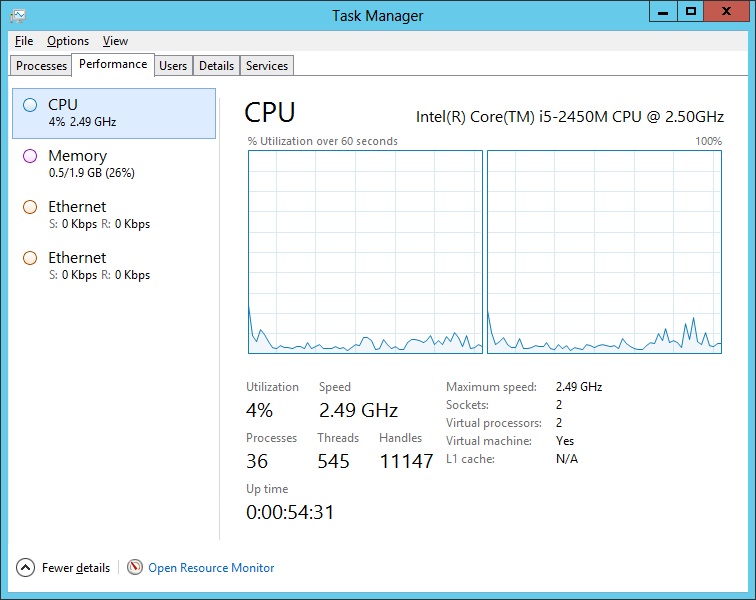
Now see below for Windows Server 2012 Task Manager. I logged onto another Virtual Machine which has Windows Server 2012 Eval Edition.

As you can see It’s giving Rated Speed by manufacturer, current Speed, maximum Speed, Number of sockets, Processors, Type of machine and even CPU Cache details(You’ll see L1,L2 and L3 cache details on real Servers).

Isn’t it Nifty? I would say yes, It’s pretty useful in many cases!

Well, Let me ask you one Interesting Question. Do you think Task Manager on Win Server 2012 is a good tool to Understand your hardware of underlying Host for your Virtual machines? If you think “Yes”, It’s a Bummer!! See below Screenshot for the Task manager from the actual Host hosting those 2 above shown VM’s.

  • Rated CPU Speed by Intel – 2.5 GHz, but the actual Speed right at that moment when I took screenshot was 3.03 GHz, which Implies my CPU(s) have TurboBoost Enabled 🙂
  • One Physical Socket, 2 Cores but 4 Logical Processors, which Implies I’ve Hyper Threading Enabled.
  • Virtualization Enabled, implies Intel VTx technology is enabled at BIOS.
  • You can also see all the three CPU caches available.

So, point to be noted is Task Manager and few other standard tools are not enough to dig into hidden details of VM Host. Do not rely on Task Manager for VM’s! Virtualization is a beast on it’s own which acts as a perfect Abstraction Layer. But for Physical Boxes, Task manager 2012 works like a champ and does it’s job pretty good compared to previous Versions of Windows as you can see…….

Windows Server 2012 – My Very First Impression!

Hey…I’ve Installed Windows Server 2012 Datacenter Edition today in my laptop and would like to share my initial experiences from twenty thousand feet distance 🙂 .

Let me tell you all, Installation Experience is awesome. It was very smooth and easy with less manual interventions! Everything was blazing smooth and fast. But I miss the Start Button 😦 Well, at least now everyone will start using Shortcuts and commands/Cmdlets 😀

Also, it looks like everything is built on Powershell 3.0 in Windows Server 2012. Most of the previous cmd utilities appears to be not working in this Version of Windows Server. Classic Examples, “DCPROMO” and “CLUSTER.exe” are no longer working. Looks like  Microsoft is pushing us towards Powershell, which is awesome. Well, there is lot of learning curve involved here!

Believe me folks…..GUI has been drastically changed from previous versions of Windows Servers.Few very basic screen caps are shown below just to show what I am taking about….

Very First Screen once you Install Windows Server:

As you can see below, there is no Start Button 😦

This comes with IE 10.0, which appears to be very better and fast compared to previous versions of IE 🙂

.Net FrameWork 4.5 and Powershell 3.0 comes out of the box once OS has been Installed.

Look at this strange new Add Roles/Features wizard below:

Though the core concepts remain same, it appears to me, MSFT made lot of enhancements and improvements for us.

Bottom Line – I liked it very much and I Should say, It’s time for exploring the real capabilities of PowerShell and ofcourse learning all the new features of this OS.


Windows Drive(s) Space Statistics – Few useful Tools!

Hey Folks! Let me introduce you to couple of my personal favorite tools for quickly understanding the space distribution on your Hard Drives on your Windows Servers. I Bet, almost all of us might have been in a “Drive running Out of space” situation at least once in our career. This is one ugly situation to be in, especially if that’s the very first time you logged onto that box during your On Call Shift and You’ve no idea what files are sitting there on Drives! So, what are the tools which helped me in gathering this info in just few minutes or even seconds, with just few Mouse Clicks??

1. WinDirStat ( Windows Directory Statistics)

2. SpaceMonger

Let’s see WinDirStat First, Let me tell you this, It’s a free tool from Sourceforge, which is aweesome 🙂 you can Just Bing it or google it or visit http://sourceforge.net/projects/windirstat/ for more info.

I’ve Installed this on one of my Test Servers. Let’s see how it works….As soon as you double Click on the executable, you’lll be welcomed with below Screen.

As you can see, it gives us options to Scan all Drives, Individual Drives or even at folder level. I’ve chosen “C:” for illustration purposes. Once the Scanning is complete, It gives a colorful report which is actually interactive(you can directly go to a file/folder just by clicking on a block whichever appears to be largest in the image).

Let’s explore the “Show FreeSpace Option” by looking at my SQL Data drive. You can enable this option by hitting F6 or enabling from Options Menu as shown below.

Before proceeding any further, I’ve a empty database named “space” which is 1.5 GB in size. See below how it looks from SSMS and from My Computer. Basically 1.5 Space has been reserved by SQL Server and OS sees it as 1.5 GB full.

From SSMS:

From Windows:

Now Let’s see from WinDirStat by enabling ShowFreeSpace Option.

As you can see, you can see freespace available for you and other large files as large blocks; visually which is much much easier to analyze, especially If you’ve option just to click on the Graphical Block and navigate to actual Folder/File.

What About Junction points?? Yes, This guy is smart enough to deal with Junction points as well! See below for all the options you’ve with this tool. ( you can configure this tool by navigating to Options->Configure Windirstat).

Navigate through the rest of Options to explore the rest yourself!

Now, let’s see spaceMonger tool….This is a similar tool which can serve almost the same purpose. See below snippet for how this tool looks like once installed on the server. You can see nice Folder hierarchy….

Statistics Tab gives us detailed info of the selected Drive as shown below

I see, SpaceMonger is Much Much Faster to collect the stats when compared to WinDirStat. SpaceMonger also has very good customization and very well integrated with Windows Inbuilt Tools as shown in the below Screenshot…

Hope, these tools will be useful for at least few of you in your day to day support or you can Install them on your Laptops! I’ve WinDirStat on my Laptop, since it’s an absolute free tool where as SpaceMonger costs a few bucks 😀

whoami and echo in Windows??

were you ever curious to know on which domain you are logged into currently and what is your user SID and what are all the groups you belong to and what are all the permissions you’ve etc??  Wouldn’t it be nice if we get all this info at a single place, with a single command? “WHOAMI” is the guy which can do it for you. Before moving on to WHOAMI please see below screenshot for legacy “ECHO” command. Basically I’m showing you how can we pull username and/or domain name.

WHOAMI:

Basic “whoami” will give you the same info..you can see below.

Let’s get little fancy now…by appending “/USER” switch.

in the above screenshot you can see SID as well…Okay, let’s see by appending “/FQDN” switch now.

well, how about appending “/ALL” Switch?

As you can see I’ve got very detailed information using “ALL”! Instead, I can buffer this to some text file using ‘>whoami.txt’ and open it later anytime using Notepad…